Title: Turbo Color Accelerator | NeXTComputers.org
Post by: Nitro on May 31, 2025, 06:00:01 PM
Post by: Nitro on May 31, 2025, 06:00:01 PM
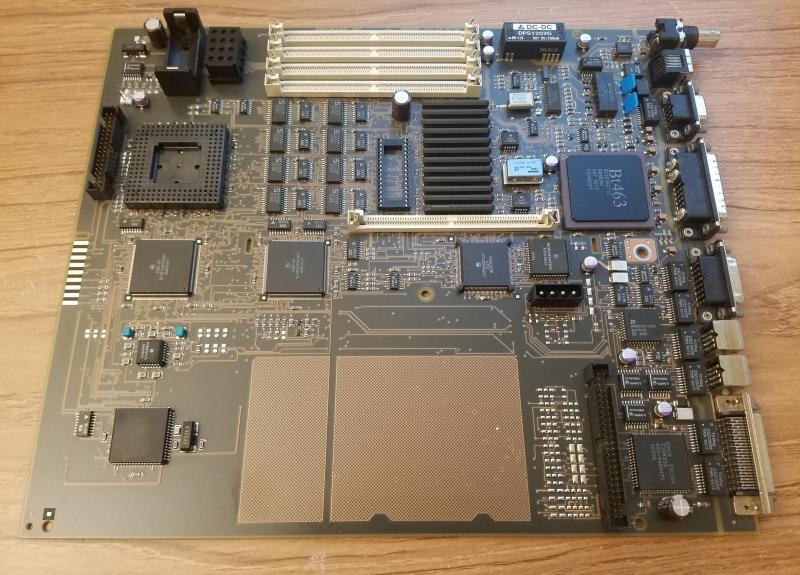
There must have been a glitch in the Matrix. We have a new NeXT accelerator for 33MHz Turbo Color NeXTstations. It's a small project aimed at a niche market inside of a niche market. The new accelerator is based on a modern clock doubler which raises the NeXT bus speed (BCLK). This makes other things on the bus faster too, including memory, video and SCSI (see benchmarks below).
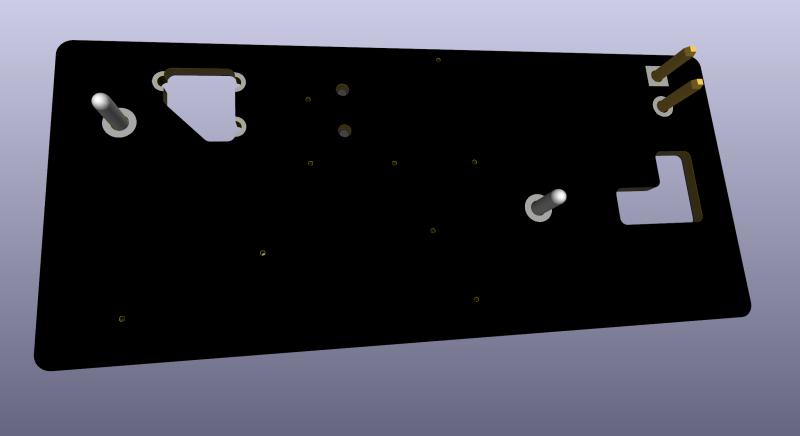
One of the new features of the PCB design is that it eliminates the prototype style wires connecting the accelerator to the logic board. All connections are made directly from the accelerator to the NeXT board, ensuring that the connections are as short as possible. The accelerator mounts securely with solder pins in matching through holes. The PCB includes a 2-pin jumper to turn overclocking on and off with either a jumper (supplied) or a user added 2-pin cable and switch. There's also an onboard micro switch that allows you to select either a 40MHz or 50MHz CPU speed. The combination of the two pin jumper and the micro switch allows the accelerator to run Turbo Color NeXTstations at 33MHz, 40MHz or 50MHz.
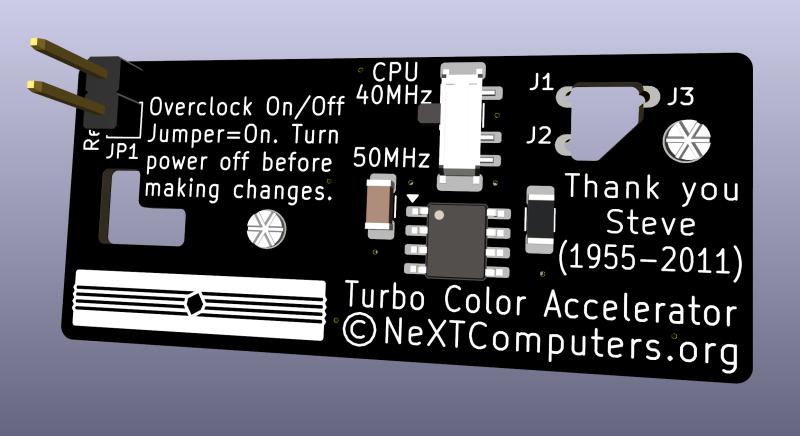
40MHz Overclock
The best value has to be the 40MHz overclock, as it's been working great with the factory 33MHz CPU, 70ns RAM and the onboard MC88915FN70 clock driver during extensive testing. At this speed there's no need to buy a faster CPU or onboard clock driver chip. If you install a 40MHz CPU and use the 40MHz option then the CPU will actually be running within spec. This overclock offers a nice boost in video and SCSI throughput as well. The 40MHz overclock is also the easiest and cheapest installation, and it scores well in the benchmarks too.
50MHz Overclock
For 50MHz overclocks it's necessary to replace the CPU with a 40MHz 68040. The onboard 70MHz MC88915FN70 clock driver (located under the floppy drive) will also need to be replaced with a 100MHz MC88915TFN100 or faster chip. You can replace this chip yourself or pay someone to do it for you. The PLCC socket shown in the picture above is not necessary for chip replacement. One last modification is a short bodge wire jumper on the U6 component located near the battery. This makes the logic board think that it's running at 33MHz which sets relaxed system and VRAM memory timings. This is only needed for 50MHz overclocks.
You'll need to check the VRAM on your Turbo Color as 50MHz requires 80ns VRAM (denoted by a -8 on the chip) with this style of overclocking. Some older Turbo Color NeXTstations have 100ns VRAM (-10) which is not fast enough at 50MHz BCLK. The 100ns VRAM worked fine during testing at 40MHz though, so that's an option for older boards.
Not all Turbo Color NeXTstations will overclock to 50MHz with this method of overclocking, so having the 40MHz overclock setting at the flip of a switch will come in handy for those situations. You can also start off at 40MHz and try 50MHz at a later time. Just be aware that at 50MHz other chips on the bus may misbehave. In some cases you can replace the onboard chips with faster ones.
Installation
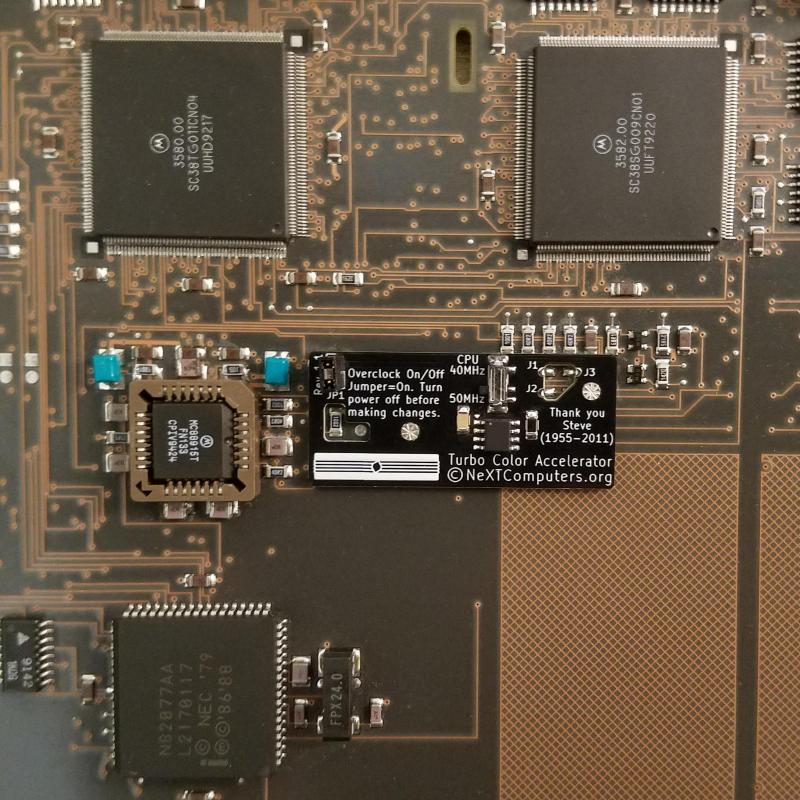
Installation requires removing the existing solder from four matching through holes in the NeXT logic board. There's a single resistor (R138) that needs to be removed along with the existing solder from two adjacent solder pads. Now the accelerator is ready to solder in place. Solder the four matching pins to securely mount the accelerator. The last step is to bridge solder the three clock signal pads (J1, J2, and J3) to the NeXT logic board SMD pads located in the accelerator PCB cutout. You can pay someone to do this installation if you're not comfortable doing this yourself. The installation requires much less soldering than recapping the board and can be done in as little as 20 minutes.
Once in place, the left side of the PCB is located under the floppy drive. If you have a spinning rust hard drive then the right side of the board is covered by the drive, with enough space between the drive and the floppy to access the 40MHz/50MHz switch. If you have a smaller solid state drive then the right side of the board is visible.
Cooling
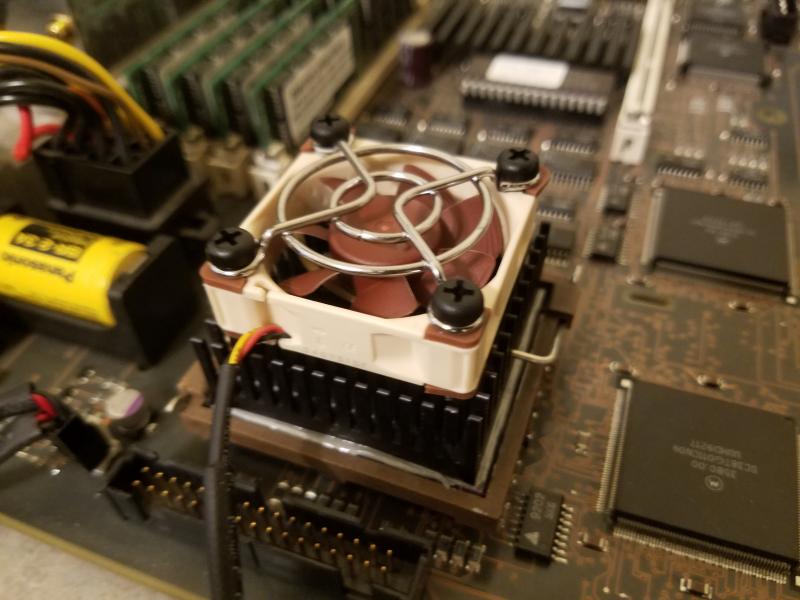
Adding a Noctua NF-A4x10 FLX 40mm fan with M4 x 18mm long ABS plastic retaining screws to the factory CPU heatsink is a good choice for cooling. The plastic screws are used as push pins to mount the fan on the factory heatsink rather than screwing them in. This prevents marring the heatsink tines like metal screws would do. Just remember to pull the screws strait out if you need to remove them. You can also add thermal paste to the cooling plate between the power supply and the case to improve heat transfer.
Cautions and Disclaimers
I want to be transparent about this project so that you know what you're getting yourself into. There's always a risk involved when soldering on your NeXT, even during a recap. There are no guarantees that a given Turbo Color will overclock. However, extensive testing and benchmarking has shown that the 33MHz test machines run fine at 40MHz and not only produce noticeably higher CPU benchmarks but also faster video and SCSI benchmarks too. If your Turbo Color will overclock to 50MHz then the performance is even better. The Accelerators are sold as a kit that needs to be soldered, so consider that before you decide to get one.
Benchmarks

NXBench 2.0
https://www.nextcomputers.org/NeXTfiles/Software/NEXTSTEP/Apps/Benchmarks/nxbench.2.0.NI.b.tar.gz
Byte UNIX Benchmark
https://www.nextcomputers.org/NeXTfiles/Software/NEXTSTEP/Apps/Benchmarks/bytebenchmark.NIHS.bs.tar.gz
iozone v1.16 (Launch with ./iozone auto)
https://www.nextcomputers.org/NeXTfiles/Software/NEXTSTEP/Apps/Benchmarks/IOZone.1.16.s.tar.gz
POVBench
https://www.nextcomputers.org/NeXTfiles/Software/NEXTSTEP/Apps/Benchmarks/PovBench/
https://www.haveland.com/index.htm?povbench/index.htm
I'm working on the Installation Guide and building the boards so I'll have more information in the near future.
One of the new features of the PCB design is that it eliminates the prototype style wires connecting the accelerator to the logic board. All connections are made directly from the accelerator to the NeXT board, ensuring that the connections are as short as possible. The accelerator mounts securely with solder pins in matching through holes. The PCB includes a 2-pin jumper to turn overclocking on and off with either a jumper (supplied) or a user added 2-pin cable and switch. There's also an onboard micro switch that allows you to select either a 40MHz or 50MHz CPU speed. The combination of the two pin jumper and the micro switch allows the accelerator to run Turbo Color NeXTstations at 33MHz, 40MHz or 50MHz.
40MHz Overclock
The best value has to be the 40MHz overclock, as it's been working great with the factory 33MHz CPU, 70ns RAM and the onboard MC88915FN70 clock driver during extensive testing. At this speed there's no need to buy a faster CPU or onboard clock driver chip. If you install a 40MHz CPU and use the 40MHz option then the CPU will actually be running within spec. This overclock offers a nice boost in video and SCSI throughput as well. The 40MHz overclock is also the easiest and cheapest installation, and it scores well in the benchmarks too.
50MHz Overclock
For 50MHz overclocks it's necessary to replace the CPU with a 40MHz 68040. The onboard 70MHz MC88915FN70 clock driver (located under the floppy drive) will also need to be replaced with a 100MHz MC88915TFN100 or faster chip. You can replace this chip yourself or pay someone to do it for you. The PLCC socket shown in the picture above is not necessary for chip replacement. One last modification is a short bodge wire jumper on the U6 component located near the battery. This makes the logic board think that it's running at 33MHz which sets relaxed system and VRAM memory timings. This is only needed for 50MHz overclocks.
You'll need to check the VRAM on your Turbo Color as 50MHz requires 80ns VRAM (denoted by a -8 on the chip) with this style of overclocking. Some older Turbo Color NeXTstations have 100ns VRAM (-10) which is not fast enough at 50MHz BCLK. The 100ns VRAM worked fine during testing at 40MHz though, so that's an option for older boards.
Not all Turbo Color NeXTstations will overclock to 50MHz with this method of overclocking, so having the 40MHz overclock setting at the flip of a switch will come in handy for those situations. You can also start off at 40MHz and try 50MHz at a later time. Just be aware that at 50MHz other chips on the bus may misbehave. In some cases you can replace the onboard chips with faster ones.
Installation
Installation requires removing the existing solder from four matching through holes in the NeXT logic board. There's a single resistor (R138) that needs to be removed along with the existing solder from two adjacent solder pads. Now the accelerator is ready to solder in place. Solder the four matching pins to securely mount the accelerator. The last step is to bridge solder the three clock signal pads (J1, J2, and J3) to the NeXT logic board SMD pads located in the accelerator PCB cutout. You can pay someone to do this installation if you're not comfortable doing this yourself. The installation requires much less soldering than recapping the board and can be done in as little as 20 minutes.
Once in place, the left side of the PCB is located under the floppy drive. If you have a spinning rust hard drive then the right side of the board is covered by the drive, with enough space between the drive and the floppy to access the 40MHz/50MHz switch. If you have a smaller solid state drive then the right side of the board is visible.
Cooling
Adding a Noctua NF-A4x10 FLX 40mm fan with M4 x 18mm long ABS plastic retaining screws to the factory CPU heatsink is a good choice for cooling. The plastic screws are used as push pins to mount the fan on the factory heatsink rather than screwing them in. This prevents marring the heatsink tines like metal screws would do. Just remember to pull the screws strait out if you need to remove them. You can also add thermal paste to the cooling plate between the power supply and the case to improve heat transfer.
Cautions and Disclaimers
I want to be transparent about this project so that you know what you're getting yourself into. There's always a risk involved when soldering on your NeXT, even during a recap. There are no guarantees that a given Turbo Color will overclock. However, extensive testing and benchmarking has shown that the 33MHz test machines run fine at 40MHz and not only produce noticeably higher CPU benchmarks but also faster video and SCSI benchmarks too. If your Turbo Color will overclock to 50MHz then the performance is even better. The Accelerators are sold as a kit that needs to be soldered, so consider that before you decide to get one.
Benchmarks
NXBench 2.0
https://www.nextcomputers.org/NeXTfiles/Software/NEXTSTEP/Apps/Benchmarks/nxbench.2.0.NI.b.tar.gz
Byte UNIX Benchmark
https://www.nextcomputers.org/NeXTfiles/Software/NEXTSTEP/Apps/Benchmarks/bytebenchmark.NIHS.bs.tar.gz
iozone v1.16 (Launch with ./iozone auto)
https://www.nextcomputers.org/NeXTfiles/Software/NEXTSTEP/Apps/Benchmarks/IOZone.1.16.s.tar.gz
POVBench
https://www.nextcomputers.org/NeXTfiles/Software/NEXTSTEP/Apps/Benchmarks/PovBench/
https://www.haveland.com/index.htm?povbench/index.htm
I'm working on the Installation Guide and building the boards so I'll have more information in the near future.
Title: Re: Turbo Color Accelerator | NeXTComputers.org
Post by: barcher174 on May 31, 2025, 08:04:55 PM
Post by: barcher174 on May 31, 2025, 08:04:55 PM
Fantastic! I would recommend putting heatsinks on the custom ASICs as well.
Title: Re: Turbo Color Accelerator | NeXTComputers.org
Post by: Nitro on May 31, 2025, 08:38:57 PM
Post by: Nitro on May 31, 2025, 08:38:57 PM
Quote from: barcher174 on May 31, 2025, 08:04:55 PMFantastic! I would recommend putting heatsinks on the custom ASICs as well.Good call. I'll install them and add that to the cooling section. Thanks!
Title: Re: Turbo Color Accelerator | NeXTComputers.org
Post by: pTeK on May 31, 2025, 11:54:40 PM
Post by: pTeK on May 31, 2025, 11:54:40 PM
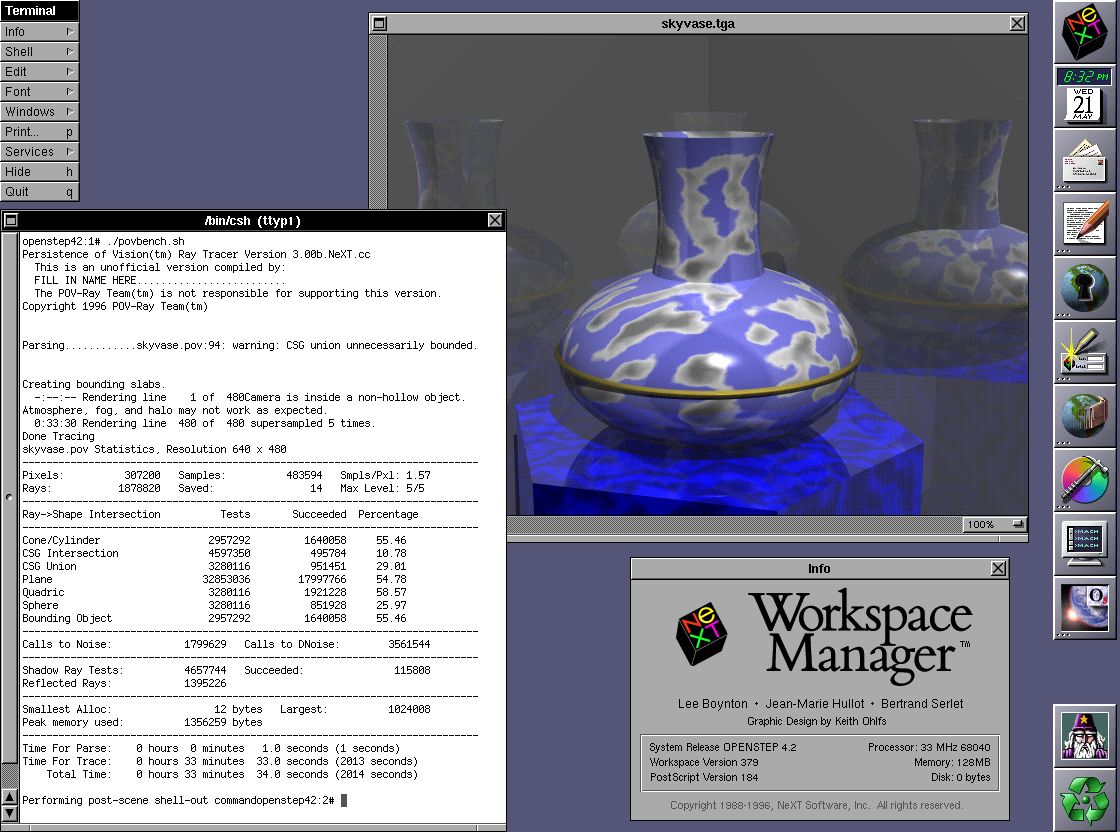
33:34 minutes to render the Vase down from 50:54 minutes. Well done :).
What is the Wizard tool above the recycle bin?
What is the Wizard tool above the recycle bin?
Title: Re: Turbo Color Accelerator | NeXTComputers.org
Post by: Nitro on June 01, 2025, 12:17:27 AM
Post by: Nitro on June 01, 2025, 12:17:27 AM
Quote from: pTeK on May 31, 2025, 11:54:40 PM33:34 minutes to render the Vase down from 50:54 minutes. Well done :).
What is the Wizard tool above the recycle bin?
Thanks, the system is a bit more responsive now. The Wizard is Pixel Magician (http://www.bacchus.com/pm_ia/index.html). It's used to render the TARGA file output from PovBench.
Title: Re: Turbo Color Accelerator | NeXTComputers.org
Post by: zigzagjoe on June 02, 2025, 12:27:10 PM
Post by: zigzagjoe on June 02, 2025, 12:27:10 PM
Nice work. For those planning to overclock using this I would definitely plan on replacing the CPU. The D-mask early 040s used by NeXT don't often work reliably at 40mhz in my experience.
You will want an 02E31F, E42K, L88M, K63H mask CPU to do 40mhz or greater. This marking can be found on the top left of the CPU. The rated speed does not matter; the mask is what is important (but beware remarked CPUs!).
You will want an 02E31F, E42K, L88M, K63H mask CPU to do 40mhz or greater. This marking can be found on the top left of the CPU. The rated speed does not matter; the mask is what is important (but beware remarked CPUs!).
Title: Re: Turbo Color Accelerator | NeXTComputers.org
Post by: Nitro on June 03, 2025, 01:44:30 AM
Post by: Nitro on June 03, 2025, 01:44:30 AM
Quote from: zigzagjoe on June 02, 2025, 12:27:10 PMNice work. For those planning to overclock using this I would definitely plan on replacing the CPU. The D-mask early 040s used by NeXT don't often work reliably at 40mhz in my experience.
You will want an 02E31F, E42K, L88M, K63H mask CPU to do 40mhz or greater. This marking can be found on the top left of the CPU. The rated speed does not matter; the mask is what is important (but beware remarked CPUs!).
Thanks for the kind words. I'm using two L88M CPUs that I purchased many years ago. The rest are new-old stock CPUs from a stash of 50MHz Newer Technology Mac accelerators that I picked up years ago for $50 each IIRC. At least I know there's a good chance that they're legit and tested at 50MHz. As for the 33MHz NeXT CPUs, I've been hammering on 3 of them for months now at 40MHz, so in many cases it will not be necessary to replace the factory CPU to run at 40MHz. That's really one of the better features next to the SCSI performance.
Title: Re: Turbo Color Accelerator | NeXTComputers.org
Post by: Andreas on June 06, 2025, 02:03:40 AM
Post by: Andreas on June 06, 2025, 02:03:40 AM
Cool thing, unfortunately I'm not very good at soldering.
Title: Re: Turbo Color Accelerator | NeXTComputers.org
Post by: Nitro on June 06, 2025, 10:05:47 AM
Post by: Nitro on June 06, 2025, 10:05:47 AM
Quote from: Andreas on June 06, 2025, 02:03:40 AMCool thing, unfortunately I'm not very good at soldering.
Rob's friend that currently recaps logic boards should be able to do the installation for those who want that service. Also, at some point I'll be selling some of the Turbo Color slabs I have that are already converted. It's been fun doing optimizations and running the benchmarks. I thought I would have grown tired of it by now but I haven't. My NeXT machines have gotten more use over the last year while developing this than the previous decade.
Title: Re: Turbo Color Accelerator | NeXTComputers.org
Post by: Nitro on June 27, 2025, 02:57:11 PM
Post by: Nitro on June 27, 2025, 02:57:11 PM
I recapped a Turbo Color logic board last night and gave it a thorough water bath cleaning. This board will be used to test the Turbo Color Accelerators.
I ran the Byte UNIX Benchmark on the Accelerator at 50MHz (128MB 50ns RAM) with a stock ZuluSCSI Blaster RP2350 and scored a 2.3
Rob will be selling the Turbo Color Accelerators soon as well as doing installations and selling converted Turbo Color NeXTstations.
Four of the Accelerators are in the wild.
Title: Re: Turbo Color Accelerator | NeXTComputers.org
Post by: Nitro on August 21, 2025, 09:29:15 PM
Post by: Nitro on August 21, 2025, 09:29:15 PM
Just a quick update; The Installation Guide (https://www.nextcomputers.org/NeXTfiles/Docs/TCA/) is online in the archives. I'll be stopping by the Black Hole soon to help Rob and his solder specialist Matt speed up some Turbo Color Slabs that he has. I sent some accelerators to Rob so you should see those available soon.
I spent some time recently working on a tiny PCB. Running the accelerator at 50MHz requires a bodge wire on component U6 to set the relaxed memory timings. When I designed the accelerator I didn't want it to have any wires connecting it to the logic board so it made sense to create a small PCB with a micro switch to allow the relaxed memory timings to be turned on and off. The thin PCB slips under pin 1 and has a castellated solder pad to aid soldering to pin 7. The PCB has 3M adhesive on the back side to secure it to the logic board. This PCB is optional and a bodge wire will work just fine in its place.
I'll have some fast Turbo Color machines available on eBay at some point. There are two 40MHz Slabs that will be available first.
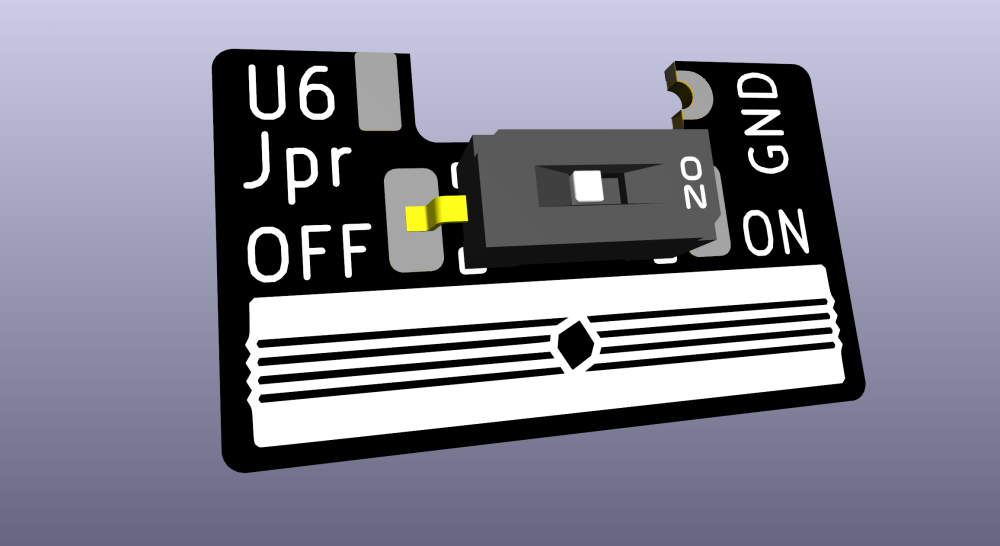
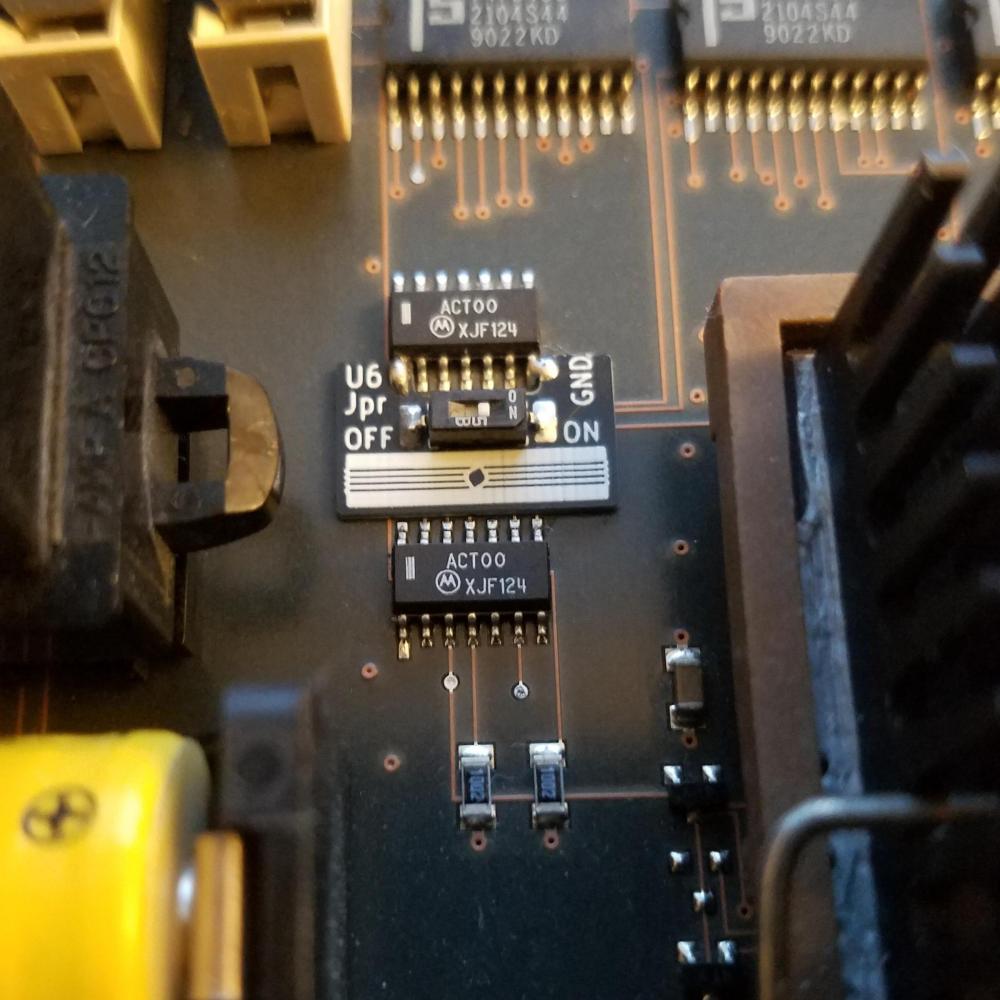