Title: Constructing a NeXTstation Y-cable
Post by: da9000 on May 07, 2007, 12:56:36 AM
Post by: da9000 on May 07, 2007, 12:56:36 AM
I recently got a NeXTstation computer but no Y-cable to be able to connect it to my non-ADB SoundBox. Being impatient, and having chanced upon an "almost perfect for the occasion" 13W3 to BNC-3 cable, I decided to make a homebrew cable. I've taken some photos during the adventure. I'll post a description before each photo. By clicking on the photo you'll be able to go the original hi-res version. Let's start!
 (http://picasaweb.google.com/adonisoamigas/ConstructingANeXTstationYCable/photo#5061655892892220818)
 (http://picasaweb.google.com/adonisoamigas/ConstructingANeXTstationYCable/photo#5061655897187188130)
 (http://picasaweb.google.com/adonisoamigas/ConstructingANeXTstationYCable/photo#5061655901482155442)
 (http://picasaweb.google.com/adonisoamigas/ConstructingANeXTstationYCable/photo#5061655905777122754)
 (http://picasaweb.google.com/adonisoamigas/ConstructingANeXTstationYCable/photo#5061655914367057362)
 (http://picasaweb.google.com/adonisoamigas/ConstructingANeXTstationYCable/photo#5061659835672198626)
 (http://picasaweb.google.com/adonisoamigas/ConstructingANeXTstationYCable/photo#5061659839967165938)
 (http://picasaweb.google.com/adonisoamigas/ConstructingANeXTstationYCable/photo#5061659844262133250)
 (http://picasaweb.google.com/adonisoamigas/ConstructingANeXTstationYCable/photo#5061659848557100562)
 (http://picasaweb.google.com/adonisoamigas/ConstructingANeXTstationYCable/photo#5061659852852067874)
 (http://picasaweb.google.com/adonisoamigas/ConstructingANeXTstationYCable/photo#5061661381860425266)
 (http://picasaweb.google.com/adonisoamigas/ConstructingANeXTstationYCable/photo#5061665165726613058)
 (http://picasaweb.google.com/adonisoamigas/ConstructingANeXTstationYCable/photo#5061682345595797074)
 (http://picasaweb.google.com/adonisoamigas/ConstructingANeXTstationYCable/photo#5061682349890764386)
Link to photo album:
http://picasaweb.google.com/adonisoamigas/ConstructingANeXTstationYCable
Conclusion: another gratifying manly job: making one's own cables :D It works great (no ghosting or anything) and costs next to nothing, although it was a pain in the ass to do certain parts, like installing and fasting the missing pins. The typically tedious part of figuring out which pins go to which wires was much less painful than I originally thought (heh, certainly after the missing pins thing). Just needed ten minutes, a DMM/VMM and a set of aligator clips and a pen/pencil/text editor to note the wires/pins. Also the RGB wires weren't very tight and they came off a couple of times and it was really hard to put'em back in properly. I had some weirdness with the NeXTstation not turning on a few times, but I think that ended up being a bad power cable.
EDIT:
To stress the most important part in the making: you have to get the right signals/pins out of the 13W3 connector to the DB19. Those once again are:
-----------
Keywords: NeXTstation, Y-cable, Ycable, Y cable, break out cable, break-out cable, soundbox
Quote
I started off by opening up a typical 13W3 to BNC-3 cable. The -3 after BNC denotes 3-wire BNC, as in Red, Green, Blue. The reason we want a 3-wire BNC is that NeXT computers output what's known as Sync-On-Green, which means the horizontal and vertical synchronization signals are combined with the green component (and because it's the least sensitive component for the human eye, the loss in quality is invisible. CORRECTION: the eye is most sensitive to green, so why is green chosen to carry synchronization signals?)
 (http://picasaweb.google.com/adonisoamigas/ConstructingANeXTstationYCable/photo#5061655892892220818)
Quote
This cable only had the RGB wires and no in-between pins, which meant I had to add them in manually. Big pain. More on that later.
 (http://picasaweb.google.com/adonisoamigas/ConstructingANeXTstationYCable/photo#5061655897187188130)
Quote
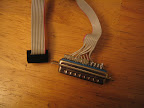
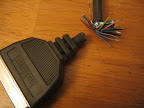
Then I took a (black) typical IBM clone parallel port printer cable (male DB25 on one end and a Centronics-34? on the other, which is what you see decapitated). I stripped the edges off the wires because I would next need to test to see which pin corresponds to which colored wire.
 (http://picasaweb.google.com/adonisoamigas/ConstructingANeXTstationYCable/photo#5061655901482155442)
Quote
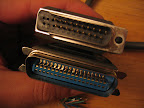
Here are the printer cable ends, although the DB25 has been modified. What I did is I used a set of pliers to pull the unwanted pins (1, 2, 3, 14, 15) because the NeXT SoundBox (or monitor) use a rare DB19 connector, which is made of "unobtainium", meaning that we have to make our own. Now pin 4 becomes what would have been pin 1 on the DB19, and pin 17 becomes what would have been pin 11 on the DB19. You'll see how this fits in later. It also turned out that in my cable pins 18-25 were all wired to ground (a single wire). This might not be strictly necessary to have, but it all depends on which pins the NeXT SoundBox expects ground. I'm not sure of that though, as I'm not about to open my pristine condition SoundBox to find out :) One other very important issue is to make sure the metal shielding that's cut apart does not, under any circumstances, touch any of the pins, because some carry +/- 12volts and it will short out. I fixed that problem with some strong glue.
 (http://picasaweb.google.com/adonisoamigas/ConstructingANeXTstationYCable/photo#5061655905777122754)
Quote
To add the missing pins to the 13W3 to BNC-3 cable, I used a spare IBM clone internal serial 9pin to external DB25 extension cable. You can see the pin on the far right has been pulled out. I actually did the soldering in place and then pushed (towards the back) the pins with the soldered wires from the front of the DB25 connector.
 (http://picasaweb.google.com/adonisoamigas/ConstructingANeXTstationYCable/photo#5061655914367057362)
Quote
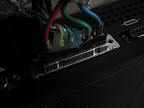
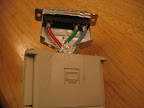
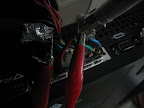
Here I have by now figured out which wires (from the printer cable) go to which pins (on the 13W3 connector) and have used some hot glue to make them stay in while I test the setup. By this time I have already double and triple checked the wires/pins to make sure I don't put a +/- 12V line to the wrong pin. The connector is attached to the back of the NeXTstation.
 (http://picasaweb.google.com/adonisoamigas/ConstructingANeXTstationYCable/photo#5061659835672198626)
Quote
Another view of the 13W3 connector this time showing a pair of aligator clips connecting the two cables' grounds.
 (http://picasaweb.google.com/adonisoamigas/ConstructingANeXTstationYCable/photo#5061659839967165938)
Quote
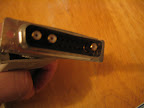
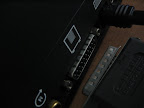
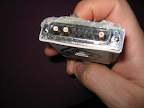
This part shows how (correct orientation) our self-made DB19 cable goes into the NeXT SoundBox. Note the "PIN 1" marking at the top-right, which points to pin 1 (or what would have been pin 1 on the original DB19)
 (http://picasaweb.google.com/adonisoamigas/ConstructingANeXTstationYCable/photo#5061659844262133250)
Quote
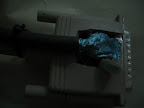
Here's another view of how our self-made DB19 is about to be connected to the NeXT SoundBox. Imagine my hand going down to the desk and extending forwards towards the SoundBox to complete the connection. Once again the "PIN 1" marking is (barely) visible at the bottom right of the modified DB25 connector.
 (http://picasaweb.google.com/adonisoamigas/ConstructingANeXTstationYCable/photo#5061659848557100562)
Quote
After the cables are tested, I moved everything back into the original 13W3 connector, after taking out part of the plastic/rubber at the top so that the printer cable would come out. I also used some wire ties to hold the two cables together so that the printer cable doesn't wiggle around and sever the thin wires.
 (http://picasaweb.google.com/adonisoamigas/ConstructingANeXTstationYCable/photo#5061659852852067874)
Quote
Some more hot glue applied to keep the whole assemblage together and then finally connected to the NeXTstation.
 (http://picasaweb.google.com/adonisoamigas/ConstructingANeXTstationYCable/photo#5061661381860425266)
Quote
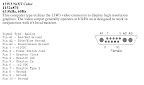
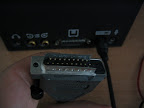
Before I forget: here are the pins that I've actually added. Now before we start, keep in mind that most pinouts you will find are for the "back of the machine" view. What you see here is the opposite view. Starting at the top-left we have: Blue, Green, and then we don't have pin 1 (of the computer-side), but pin 5 (Monitor In), 4 (Monitor Out), 3 (Monitor Clock), 2 (Power Switch Control), 1 (+12V DC), and underneath, left to right again, 10 (no connect), 9 (no connect), 8 (ground), 7 (Monitor Type 2 , but not connected), 6 (-12V DC) and finally Red.
 (http://picasaweb.google.com/adonisoamigas/ConstructingANeXTstationYCable/photo#5061665165726613058)
Quote
NeXTcube DB19 (female) connector. Source: http://www.netbsd.org/Ports/next68k/faq.html#monitor-pinout
 (http://picasaweb.google.com/adonisoamigas/ConstructingANeXTstationYCable/photo#5061682345595797074)
Quote
NeXTstation 13W3 (female) connector. Source: http://www.monitorworld.com/Cables/video_standards.html
 (http://picasaweb.google.com/adonisoamigas/ConstructingANeXTstationYCable/photo#5061682349890764386)
Link to photo album:
http://picasaweb.google.com/adonisoamigas/ConstructingANeXTstationYCable
Conclusion: another gratifying manly job: making one's own cables :D It works great (no ghosting or anything) and costs next to nothing, although it was a pain in the ass to do certain parts, like installing and fasting the missing pins. The typically tedious part of figuring out which pins go to which wires was much less painful than I originally thought (heh, certainly after the missing pins thing). Just needed ten minutes, a DMM/VMM and a set of aligator clips and a pen/pencil/text editor to note the wires/pins. Also the RGB wires weren't very tight and they came off a couple of times and it was really hard to put'em back in properly. I had some weirdness with the NeXTstation not turning on a few times, but I think that ended up being a bad power cable.
EDIT:
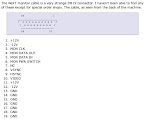
To stress the most important part in the making: you have to get the right signals/pins out of the 13W3 connector to the DB19. Those once again are:
Code Select
NOTE: pins below are numbered by me (and irregardless of how the above diagrams
 list them, since those diagrams list the female connectors on the computer
 side) from left to right, and top to bottom, while THE TWO *MALE* *CABLE* ENDS
 (with the pins) ARE FACING YOU like so:

1             N
_______________
\ . . . . . . /
 \ . . . . . /
   ---------
*(Note: above figure is neither a DB19, nor a 13W3. For illustration only.)

Signal name          | 13W3 connector pin | DB19 pin
-----------------------------------------------------
+12V DC              |        5           |   1 & 11
Power Switch Control |        4           |     6
Monitor Clock        |        3           |     3
Monitor Out          |        2           |     4
Monitor In           |        1           |     5
-12V DC              |       10           |   2 & 12
Ground               |        8           |   13-19

Please always double check your work and my table as I wrote this from memory.
-----------
Keywords: NeXTstation, Y-cable, Ycable, Y cable, break out cable, break-out cable, soundbox
Title: Constructing a NeXTstation Y-cable
Post by: nextchef on May 07, 2007, 09:27:44 AM
Post by: nextchef on May 07, 2007, 09:27:44 AM
Nice Job with the cable, and the documentation. It will be a great help to quite a few people here who have not been able to get a "Y" cable. Don't be surprised if you get a few PM's asking you to make a few more.
Nice job, and thanks for doin the hard work figuring this out.
Chef
Nice job, and thanks for doin the hard work figuring this out.
Chef
Title: Constructing a NeXTstation Y-cable
Post by: da9000 on May 07, 2007, 10:37:52 AM
Post by: da9000 on May 07, 2007, 10:37:52 AM
Quote from: "nextchef"Nice Job with the cable, and the documentation. It will be a great help to quite a few people here who have not been able to get a "Y" cable. Don't be surprised if you get a few PM's asking you to make a few more.
Nice job, and thanks for doin the hard work figuring this out.
Chef
Thanks Chef! I added a table of the signals to pins, so now there is true (and hopefully error free) documentation, so I hope this helps out anyone wanting to make such a cable. It was a pain at times but in the end when you see that nice ole NeXT logo greeting you on your monitor, it's all worth it :)
Title: Constructing a NeXTstation Y-cable
Post by: nextchef on May 07, 2007, 10:41:15 AM
Post by: nextchef on May 07, 2007, 10:41:15 AM
I actually have a few DB19 connectors that I picked up from a local electronics shop for just this purpose, but then I got a real cable so did not need them. They are hard to find, but not impossible.
Chef
Chef
Title: Constructing a NeXTstation Y-cable
Post by: da9000 on May 07, 2007, 10:53:47 AM
Post by: da9000 on May 07, 2007, 10:53:47 AM
Quote from: "nextchef"I actually have a few DB19 connectors that I picked up from a local electronics shop for just this purpose, but then I got a real cable so did not need them. They are hard to find, but not impossible.
Oh, nice. I saw some other threads in the forum talking about where to find them. I looked around here a bit, just a tiny bit and didn't find anything, and since I'm overflowing with cables (I'll have a ton of Mac cables and Mac stuff at some point, hopefully soon, that should be of a lot of interest to some of the folks here), I decided to sacrifice one of them instead of trying desperately to find a DB19. Was a bit impatient too. :)
Title: Constructing a NeXTstation Y-cable
Post by: Nightengale on May 08, 2007, 07:46:03 PM
Post by: Nightengale on May 08, 2007, 07:46:03 PM
Quote from: "nextchef"Nice Job with the cable, and the documentation. It will be a great help to quite a few people here who have not been able to get a "Y" cable. Don't be surprised if you get a few PM's asking you to make a few more.+1 Great work
Nice job, and thanks for doin the hard work figuring this out.
Chef
Title: Constructing a NeXTstation Y-cable
Post by: Computolio on May 08, 2007, 09:14:34 PM
Post by: Computolio on May 08, 2007, 09:14:34 PM
DB-19 connectors aren't too hard to find. In fact, they're a lot easier to find than 13W3 connectors. Just order them from iec.net.
I didn't realize that molded cables could be opened up like that, though. Might be something to try.
I didn't realize that molded cables could be opened up like that, though. Might be something to try.
Title: Constructing a NeXTstation Y-cable
Post by: Nitro on May 08, 2007, 11:12:59 PM
Post by: Nitro on May 08, 2007, 11:12:59 PM
Nice work da9000, thanks for putting this information together. :)
Title: Constructing a NeXTstation Y-cable
Post by: da9000 on May 09, 2007, 12:10:38 AM
Post by: da9000 on May 09, 2007, 12:10:38 AM
First of all, thanks for the cheers/feedback everyone! You'll be much more excited when I get some time to finally make a NeXT go past 33Mhz and start challenging the Pyro and the Nitro boards, muhahaha. Not yet though :(
I didn't know, Computolio. I'll check out http://www.iec.net for the next (pun intended) cable.
As for the molded cables, you're right, many do look like they're not hollow inside. As far as this one was concerned, it felt hollow inside, so I said, what the heck. I didn't want to hack any of my original Sun 13W3 cables anyways.
Quote from: "Computolio"DB-19 connectors aren't too hard to find. In fact, they're a lot easier to find than 13W3 connectors. Just order them from iec.net.
I didn't realize that molded cables could be opened up like that, though. Might be something to try.
I didn't know, Computolio. I'll check out http://www.iec.net for the next (pun intended) cable.
As for the molded cables, you're right, many do look like they're not hollow inside. As far as this one was concerned, it felt hollow inside, so I said, what the heck. I didn't want to hack any of my original Sun 13W3 cables anyways.
Title: Constructing a NeXTstation Y-cable
Post by: nextchef on May 09, 2007, 09:15:42 AM
Post by: nextchef on May 09, 2007, 09:15:42 AM
Here is the relevant page, for those interested. Pretty pricey, as I paid about $0.60 each for the ones I got locally.
http://www.connectworld.net/cgi-bin/iec/05MPartDB19.html
And the 13w3 relevant page.
http://www.connectworld.net/cgi-bin/iec/05CDB13W3.html
Chef
http://www.connectworld.net/cgi-bin/iec/05MPartDB19.html
And the 13w3 relevant page.
http://www.connectworld.net/cgi-bin/iec/05CDB13W3.html
Chef
Title: Constructing a NeXTstation Y-cable
Post by: Computolio on May 09, 2007, 12:04:29 PM
Post by: Computolio on May 09, 2007, 12:04:29 PM
The DB-19 stuff is almost reasonable, but the 13W3 stuff is goddamn hilarious. $40 for a connector is nothing short of amazing.
Title: Constructing a NeXTstation Y-cable
Post by: da9000 on May 09, 2007, 03:47:23 PM
Post by: da9000 on May 09, 2007, 03:47:23 PM
Quote from: "Computolio"The DB-19 stuff is almost reasonable, but the 13W3 stuff is goddamn hilarious. $40 for a connector is nothing short of amazing.
Yeah, that's plain stupid!
Thanks for the exact links nextchef.